
Wix Answers Help Center
Setting Your Live Chat Contact Options During and Outside of Business Hours
Easily customize your Live Chat Widget's behavior both during and after working hours.
Learn how to set your Live Chat contact options:
Contact Options During Business Hours
Send an automatic greeting message or request an email address from unknown customers that reach out during business hours.
To set your contact options during business hours:
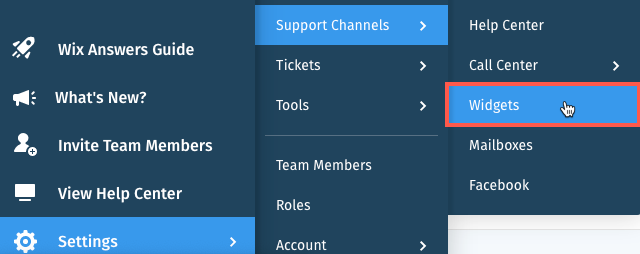
- In the Wix Answers app, go to Settings > Support Channels > Widgets.
- (If you have more than one widget) Click the widget name and select the relevant widget.
- Click Live Chat in the Messaging Module.
- (For multilingual support) Select a language next to Chat Setup in.
- Click Contact Options During Business Hours.
- Set your Live Chat widget's behavior during business hours:
- Send an automatic greeting message: Select the checkbox and enter a greeting message that is sent immediately after your customer begins a chat.
- Request an email address from unknown customers: Select the checkbox and enter the email request and thank you messages.
Note: Click the Toggle icon next to Email submission is optional to allow your customers to chat without entering their email addresses.
- Click Save.
Contact Options Outside Business Hours
Decide how your Live Chat Widget operates after business hours. Block contact options, enable a contact form, or allow Live Chat with after-hours responses to let customers know you're unavailable.
To set your contact options outside business hours:
- In the Wix Answers app, go to Settings > Support Channels > Widgets.

- (If you have more than one widget) Click the widget name and select the relevant widget.
- Click Live Chat in the Messaging Module.
- (For multilingual support) Select a language next to Chat Setup in.
- Click Contact Options Outside Business Hours.
- Set your Live Chat widget's behavior outside of business hours:
- Block Contact option: Select to block customers from contacting you, then click an option:
- Hide widget / Contact Option: Completely hides your widget's contact options.
- Let your customers know that you’re away: Set the options to customize how you communicate to customers that your chat is unavailable.
- Users Will Contact You Via Contact Form: Select to allow customers to contact you via a contact form the customize your form:
- Enter a title for your form in the Title field.
- (Optional) Add additional fields to your contact form:
- Click Add Field.
- Click the checkbox next to an active field to add it.
- Click Create new field, select a field type, fill out the field, and click Create.
- (For multilingual help centers) Click Activate next to the relevant field then click Update.
- Click Add Selected Fields.
- Users Can Still Contact You Via Chat: Select to allow customers to contact you via chat outside of chat business hours, then set up the widget's behavior.
- Block Contact option: Select to block customers from contacting you, then click an option:
- Click Save.
Was this article helpful?