
Wix Answers Help Center
Working with Automatic Actions
Use Automatic Actions to automate procedures in your Ticketing System so your team can work more efficiently. For each Automatic Action you create, you set the conditions that trigger customizable actions. When a ticket meets the conditions, the action is applied instantly.
Examples of Automatic Actions:
- Assign tickets sent to specific mailboxes to specific agents or groups. Learn more
- Apply labels to tickets sent from specific customers. Learn more
- Send automated emails when tickets are sent from specific channels. Learn more
Automatic Actions Do Not Trigger Webhooks:
If you implement webhooks, please note that automatic do not trigger webhooks.
Tip:
You can also use pre-made customizable Spotter Scenarios to automate repetitive tasks.
To create an Automatic Action:
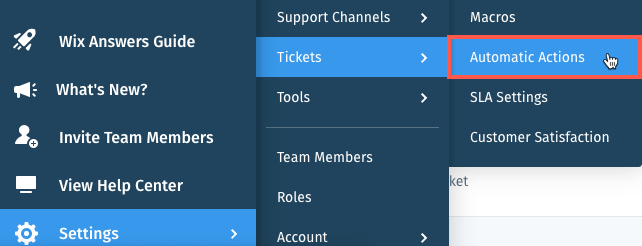
- In the Wix Answers app, go to Settings > Tickets > Automatic Actions.
- Click + Create New Action.
Note: (If creating your 1st Automatic Action) Click Start Now then click Create New Action. - Enter the Name and Description (optional) for the action.
- Click the toggle(s)
 to set the Apply action when trigger:
- A new ticket is created: Apply the action when a new ticket is created.
- A user replies to a ticket: Apply the action when a customer replies to their ticket.
Note: This trigger works only for customer replies sent via email or Facebook. - A team member replies to a ticket: Apply the action when a team member replies to a ticket.
Note: This trigger works only when replying to a single ticket, via email or Facebook.

- Set the Apply action if condition(s) from the relevant drop-down menu(s):
- ANY of these conditions occur: Apply the action if any of the conditions are met.
- ALL of these conditions occur: Apply the action if all of the conditions are met.
Show me the conditions

In the example above:
The action is applied if the ticket description includes "chargeback", "blocked account", or "fraud", the ticket language is English and its source is not Facebook.
6. (Optional) Click Add another condition to add another condition to the action.
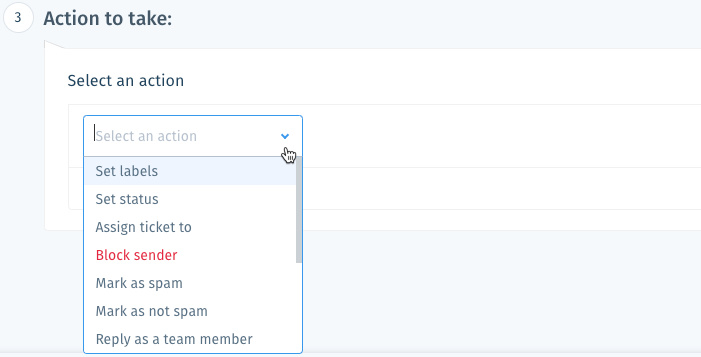
7. Set the Action to take from the Select an action drop-down.
Tell me more
8. (Optional) Click Add Another Action to add another action.
9. Click Save.
Notes:
- HTML and placeholders are supported in the Send an email action.
- Your Automatic Actions trigger in descending order from top to bottom and therefore affect each other. Click Reorder at the top of your Automatic Actions list to change the order in which the actions occur.
- You can create up to 100 Automatic Actions in your Wix Answers account.
Send emails to Slack:
If you've connected Slack, you can automatically send emails to your Slack channels. In Slack, create email addresses for the relevant channels. Then in Wix Answers, choose Send an email as your Action to take in step 7 above. Learn more about sending emails to Slack.
Was this article helpful?