
Wix Answers Help Center
Adding a Line to Your Call Center
Add a call line to start using a new phone number for inbound or outbound calls. When adding your line, choose the country code, line type (local or toll free), and more customization options. Create as many lines as you need phone numbers for in your call center.
Important:
- To add a new line, you must be an administrator or have a custom role with Call Center enabled in the Settings - Support Channels permissions.
- Line purchases are monthly subscriptions that automatically deduct from your account credits.
- If you want to port existing phone numbers to your call center, click here for instructions.
To add a new line to your call center:
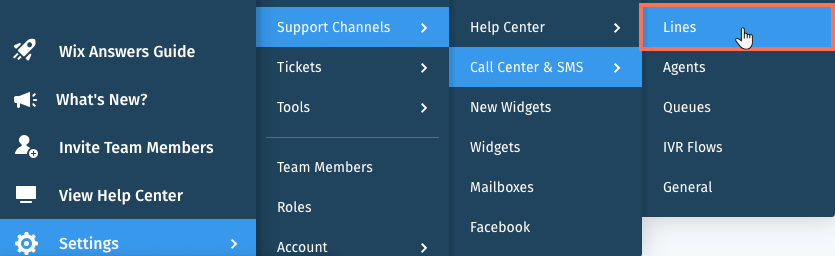
- In the Wix Answers app, go to Settings > Support Channels > Call Center & SMS > Lines.
- Click + Add New Line.
- Enter the Line Name and Line Description used for internal purposes.
Note: If you already have a line, click Make this the default line for outbound calls to make it your default outgoing line. - Click Next.
- Enter the name of the country you want to use for the phone number's country code and select it from the list.

- Choose a line type:
- Local phone number: Use a phone number with a local area code.
- Toll free phone number: Use a phone number with a toll-free area code.
- (Optional) Choose line customization options:
- Use a specific area code or prefix: Enter the area code or prefix you want to use for the phone number.
- Use digits that correspond to letters: Enter a pattern of digits you want to include in the phone number.
For example: Enter "SELL" if you want the number to include "7355" (the dial pad numbers that correspond with "SELL").

- Click Next.
- Select an available number from the list.
Note: If there are no matching phone numbers or you'd like to edit your line preferences, click Back and repeat steps 6-8. - Review the line details and click Create Line when you're ready.
Note: You may need to submit proof of a valid address or identification to purchase some phone numbers. Learn More - Click Manage the New Line to go to the line settings.
Next:
- Learn how to enable incoming calls from your line settings.
- Learn how to set up your line's business hours.
- Learn how to enable SMS in your line.
- Learn how to add WhatsApp support to your line.
Was this article helpful?