Wix Answers Help Center
Creating an Automatic Action for Your SLA Policy
Create an Automatic Action to apply a Service Level Agreement (SLA) policy to tickets that meet conditions you define. If you have multiple SLA policies, create Automatic Actions for each.
Before you begin:
Create an SLA policy so you can apply it to tickets using an Automatic Action.
Important:
We're currently in the process of releasing a new version of SLA policies. If you set up Details & Conditions in step 1 of creating your SLA policies, you do not need to create Automatic Actions for them. Your policies will apply to tickets based on the conditions you set in step 1.
To create an Automatic Action for your SLA policy:
- In the Wix Answers app, go to Settings > Tickets > Automatic Actions.

- Click + Create New Action.
Note: Click Start Now then click Create New Action if this is your first Automatic Action. - Enter a name for the action.
- (Optional) Enter a description of the action.
- Click the toggle(s) under Apply action when to apply the action when:
- A new ticket is created: The action is applied when a new ticket is created.
- A user replies to a ticket: The action is applied when a customer replies to a ticket.
Note: This does not include customer replies in active chat sessions. - A team member replies to a ticket: The action is applied when a team member replies to a ticket.
Note: This does not include replying to multiple tickets at once or replying in active chat sessions.

- Set the conditions that will cause the action to occur:
- ANY of these conditions occur: Set the action that occurs if ANY of the conditions are met:
- Click the drop-down menu and select a condition.
- Click the Operator drop-down menu and select an option (e.g. Is, Is Not).
Note: If you selected User is authenticated or a Checkbox custom field type, click Yes or No and skip the next step. - Enter the value that the condition must meet.
- (Optional) Click Add Another Condition to add another condition then repeat the steps.
- ALL of these conditions occur: Set the action that occurs only if ALL of the conditions are met:
- Click the drop-down menu and select a condition.
- Click the Operator drop-down menu and select an option (e.g. Is, Is Not).
Note: If you selected User is authenticated or a Checkbox custom field type, click Yes or No and skip the next step. - Enter the value that the condition must meet.
- (Optional) Click Add Another Condition to add another condition then repeat the steps.
- ANY of these conditions occur: Set the action that occurs if ANY of the conditions are met:

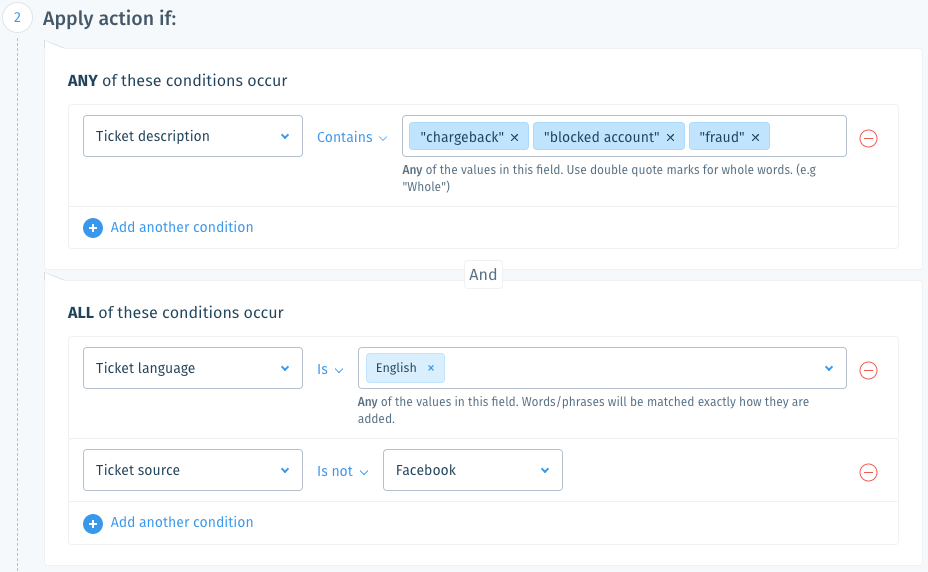
In the example above:
The action is applied if the ticket description includes "chargeback", "blocked account", or "fraud", and the ticket language is English and its source is not Facebook.
- Click the Select an action drop-down under Action to take and select Set SLA.
- Click the Select Policy drop-down and select the SLA policy you want to apply.

- Click Save.
Tip:
Add SLA filters to views on your Tickets List to organize tickets that have met, missed, or are close to missing their SLA policy target timeframes.
Was this article helpful?
