
Wix Answers Help Center
Adding Team Members to Groups
Add team members to groups so you can assign tickets and send notifications to entire groups, instead of individual members. Use groups in various Wix Answers features such as automatic ticket routing, Spotter, announcements, and more.
Show me group-related Wix Answers features
Note:
Team members must accept an invite to join your Wix Answers account before you can add them to groups. Learn how to invite people to your Wix Answers account.
Learn more about:
Managing multiple people's groups in the Control Room
From the Control Room, you can add or remove multiple people from the same groups at once.
Important:
The Control Room is not yet available in all Wix Answers accounts. Contact us if you would like to add this feature to your account.
To manage people's groups in bulk from the Control Room:
- Click the Control Room icon
 in the side panel on the left.
 - Hover over the relevant team member's name and click the checkbox.

- Repeat step 2 above to select up to 25 agents.
- Click Edit Groups in the footer.
- Choose what you want to do:
- Add groups: Click the Add groups drop-down and select the group(s) you want to add the agent(s) to, then click Update.
- Remove groups: Click the Remove groups drop-down and select the group(s) you want to remove the agent(s) from, then click Update.
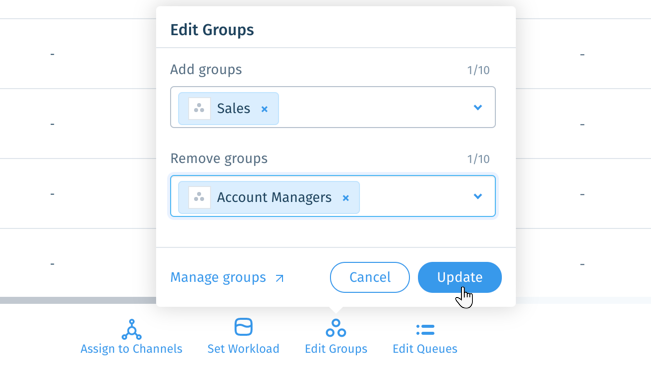
Tip:
Click Manage groups to go to your team member settings where you can create and manage all the groups in your account. Learn more
Managing a person's groups in their Team Member Overview
After accessing the relevant person's Team Member Overview, you can add them groups.
Important:
We are currently working on releasing a new version of the Team Member Overview. If the directions on your screen do not match the steps in this article, contact us for help.
To manage a person's groups in their Team Member Overview:
- Access the relevant person's Team Member Overview from any of the following locations:
- Control Room: Click the Control Room icon in the side panel on the left and select the relevant team member. Learn more about the Control Room.
- Team Members table: Go to Settings > Team Members and select the relevant team member.
- Call Center Agents tab: Hover over the Call Center icon
 in the side panel, click Agents, then select the relevant team member.
 - Call Center Settings: Go to Settings > Supported Channels > Call Center & SMS > Agents and select the relevant team member.
- Ticket Page: Go to the relevant ticket and click the name of the relevant team member from the ticket timeline.
- Control Room: Click the Control Room icon
- Click + Add to Groups and select the group you'd like to add the team member to.

- Repeat step 2 above to add the team member to more groups.
Need to remove someone from the group?
Hover over the relevant group and click Remove on the right.
Managing a group's members in the team member settings
From your team member settings where you create groups, select a group to add or remove members.
To manage a group's members:
- Hover over Settings
 in the side panel and click Team Members.
 - Select the relevant group on the left.

Tip:
Click + Create New Group if you need to create a new group and add members to it.
- Click + Add Members to Group on the right and select the team member you want to add to the group.
Tip: Use the search bar to quickly find team members.

- Repeat step 3 above to add more team members to the group.
Need to remove someone from the group?
Hover over the relevant team member's name, click the Show More icon  on the right, and select Delete. Then click Yes, remove agent from group.
on the right, and select Delete. Then click Yes, remove agent from group.Was this article helpful?