
Wix Answers Help Center
Previewing Tickets in Your Ticket Lists
Use ticket previews to quickly gain valuable information about tickets before selecting them. Understanding how to use each component of the Ticket Preview panel helps you select the most relevant tickets for your needs.

To preview tickets in your ticket lists:
- Click the One Inbox icon
 in the side panel on the left.
 - (Optional) Click the Language icon
 and select a language.

- Select a View on the left. Learn more about managing your Views.
- Click the Layout drop-down next to the Search field and select a display type:
- Split Pane: Display ticket previews in Active and Inactive ticket lists on the left. Selecting a ticket displays it in the ticket panel on the right. Learn more about active vs. inactive tickets.
- List: Display ticket previews in a list layout where clicking a ticket opens it in a new tab.
- Table: Display ticket previews in a table layout where you choose which columns display by clicking Edit Columns at the top-right.

- Choose what you want to do:
Search for tickets within the selected View
Filter your ticket list by status

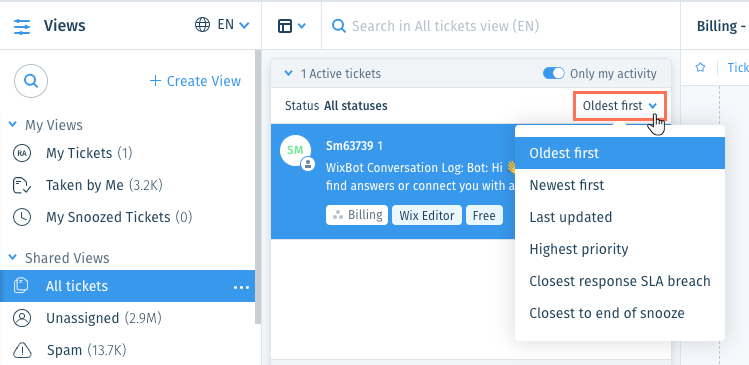
Sort your ticket lists
Show only your own Active tickets (Split Pane layout)
 at the top of the Active tickets list to show only your active tickets in the list.
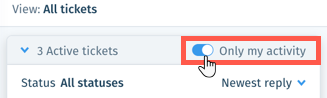
Edit the columns displayed (Table layout)
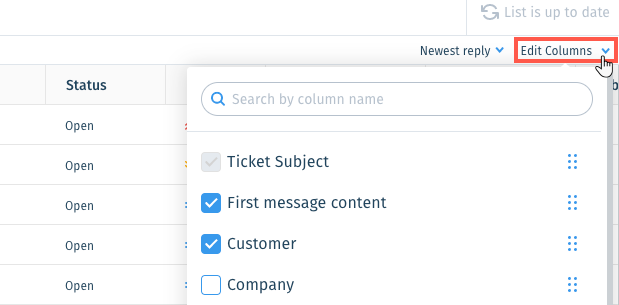
 up or down to reorder the columns.
 6. Preview the following details about each ticket in your ticket lists:
- Customer profile image or initials: View the customer's profile image or initials next to their name. Click to select multiple tickets and apply bulk actions.

- Customer name and total ticket messages: View the customer's name and the total number of messages on the ticket, including team member messages.

- Priority Level: View the ticket's priority level next to the timestamp of the last reply:
- High: The following icon displays on tickets with High priority levels:

- Medium: No icon displays on tickets with the default Medium priority level.
- Low: The following icon displays on tickets with Low priority levels:

- High: The following icon displays on tickets with High priority levels:

- Timestamp: View the length of time since the ticket was last updated or last opened, depending on your sorting selection, next to the Source icon. Hover over the timestamp for details.
Note: Timestamps do not appear if you select Closest response SLA breach or Closest to end of snooze as the sorting option.

- Source: View the support channel the ticket was created from at the top right.

Tell me more
 Web: Tickets created from the contact form in your help center.
  Email: Tickets created when customers email your Wix Answers mailboxes.
  Phone: Tickets created from your call center.
  Facebook: Tickets created from your Facebook Pages.
  WhatsApp: Tickets created from WhatsApp messages.
 Chat: Tickets created from Live Chat widgets.
  Widget: Tickets created from the contact form in your widgets.
 API: Tickets created via API.
  SMS: Tickets created from SMS text messages.
 - Last message sent preview: Preview the last message sent under the customer's name. Hover over the message to preview the entire message.
Note: "Typing" displays when a team member is creating a reply.

- New Messages icon: View the total number of messages sent by your customer since the last team member reply in the blue New Messages icon
 .
.

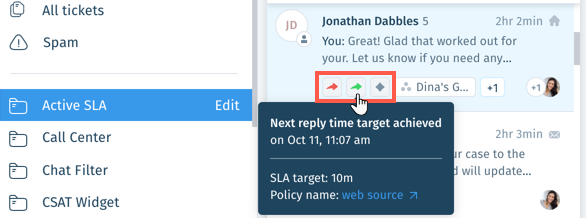
- SLA targets: Hover over the relevant SLA icon to view information about the applied policy. Learn more about SLAs (Service Level Agreements).
Note: The color of the SLA icon indicates whether the target has time remaining (grey), has been achieved (green), or has been breached (red).
- Assigned team member or group: View the assigned team member or group below the message preview.
Tip: If the team member or group name is cut off, hover over it to view the entire name.

- Labels: View the ticket's label(s) below the message preview.
Note: When there's not enough space to display label names, they appear when you hover over the + [number].

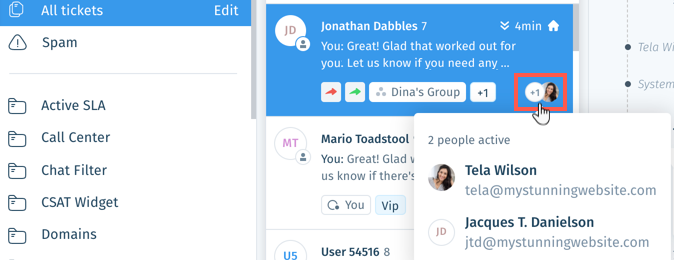
- Active team members: View the team members that have active sessions on the ticket at the bottom-right.
Note: When multiple team members are active on the same ticket, hover over + [number] to view all the active team members.
7. Select a ticket when you're ready to work on it. Learn more about replying to tickets.
Tip:
In the Split Pane layout, click the Active tickets drop-down  to collapse or expand your Active tickets list.
to collapse or expand your Active tickets list.Adding the following filters delays some real-time updates to the ticket lists by 30-60 seconds:
- Call filters
- Custom fields
- Related to Article/Category
- Received from / Sent to
- SLA
Learn more about adding filters to Views.
Was this article helpful?