
Wix Answers Help Center
Adding a Company
Add companies so you can associate customers with them and add team members as account managers, followers, and points of contact. Add other details such as the company's email domains and custom company fields. You can then use the company in various features throughout the Wix Answers platform.
Note:
To add a company to your Contacts, you must be an administrator or have a custom role with the relevant actions enabled in the Contacts - Manage Companies permission.
To add a company:
- Hover over Contacts
 in the side panel and click Companies.
 - Click + Add Company.
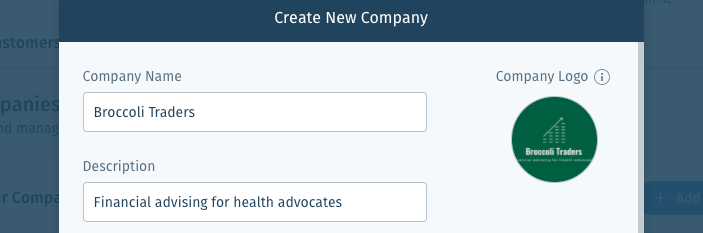
- Add the company's name, description and logo:
- Company Name: Enter the name of the company.
- Description: Enter the company description that appears only in the Company Page.
- Company Logo: Click the + icon
 under Company Logo, select a file from your computer and click Open.
Note: You can upload company logos as jpg, png, or bmp files up to 5MB.
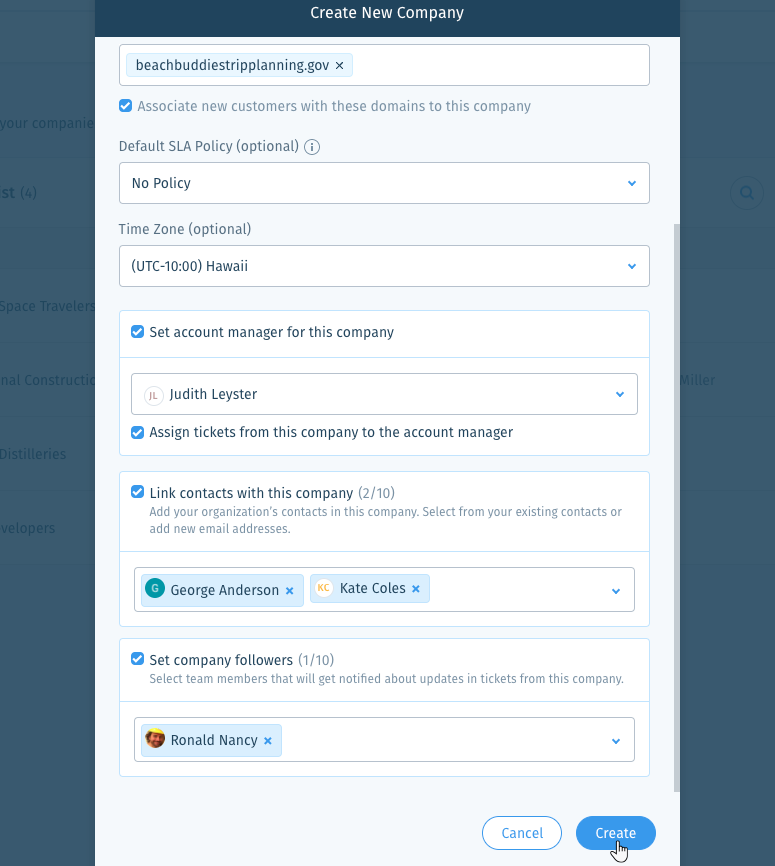
- Enter email domains for the company if they use custom domains for their email addresses (e.g. enter mystunningwebsite.com if their email addresses end with @mystunningwebsite.com):
- Enter the custom domain name used for their email addresses in the Email Domains field.
- Press Enter on your keyboard to add another email domain.
- Click Associate new customers with these domains to this company to associate new customers with the company if they have the same email domain(s).

- Set the Customer Portal Permissions to choose which tickets the company's associated contacts can view and reply to in their Customer Portal. Click the drop-down and choose an option:
Note: The Customer Portal is not yet available in all Wix Answers accounts. Contact us if you would like to add this feature to your account.- Access personal tickets only: The company's associated contacts can access only their own tickets in the Customer Portal.
- Access all company's tickets: The company's associated contacts can view and reply to all the company's tickets in the Customer Portal. This includes tickets submitted by other contacts that are associated with the company.

Note:
You can set different Customer Portal permissions for each contact from their Customer Page that will override these settings.
- (Optional) Click the Default SLA Policy drop-down and select an SLA policy to apply to the company's tickets. Learn more about creating SLA policies.
- (Optional) Select the company's time zone from the Time Zone drop-down. You can use this when setting the operational hours and targets for an SLA policy.
- (Optional) Set a team member as the company's account manager:
- Click the checkbox next to Set account manager for this company.
- Select the team member that will be the account manager from the drop-down.
- Click the checkbox next to Assign tickets from this company to the account manager if you want new tickets from the company to be automatically assigned to the account manager.
- (Optional) Click the checkbox next to Set Points of Contact for this company and select up to 10 customers or team members to add them as Points of Contacts of the company. You can add Points of Contacts to tickets as CC recipients in Automatic Actions.
Note: Adding customers as Points of Contacts also associates them with the company. - (Optional) Click Set company followers and select up to 10 team members to automatically notify them when the company's tickets have updates.
- Click Create.
Use account managers in the following features:
- Automatic Actions: Use account managers in the Apply action if conditions and the resulting Action to take selection. Learn more
- Spotter: Send notifications to account managers in several different scenarios. Learn more
- SLA policies: Send notifications to account managers when SLA targets are breached or about to be breached. Learn more
Tip:
You can edit an existing company from its Company Page. Learn more
Was this article helpful?