
Wix Answers Help Center
Creating an Outbound Chat Ticket
Initiate chat conversations with customers from any of your Live Chat widgets. Your customer will see your outbound chat message immediately if they're on the same page as your widget. If they've closed the tab or are offline, they'll see your message when they return to the page.
Important:
To create chat tickets, you must be an administrator or agent, or have a custom role with Chat tickets enabled in the Tickets > Create new tickets permissions.
To create a new chat ticket:
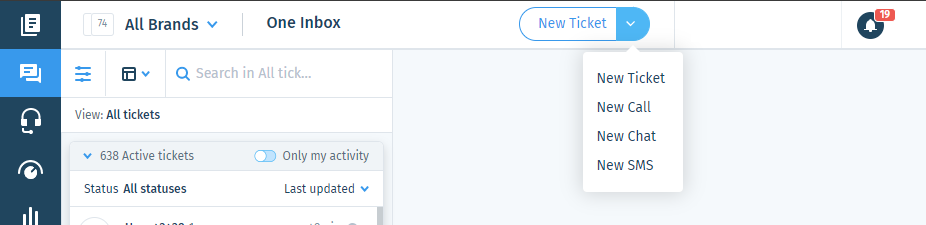
- Click the One Inbox icon
 in the side panel on the left.
 - Click the New Ticket drop-down at the top bar and select New Chat.
Note:
You can also access the New ticket drop-down from:
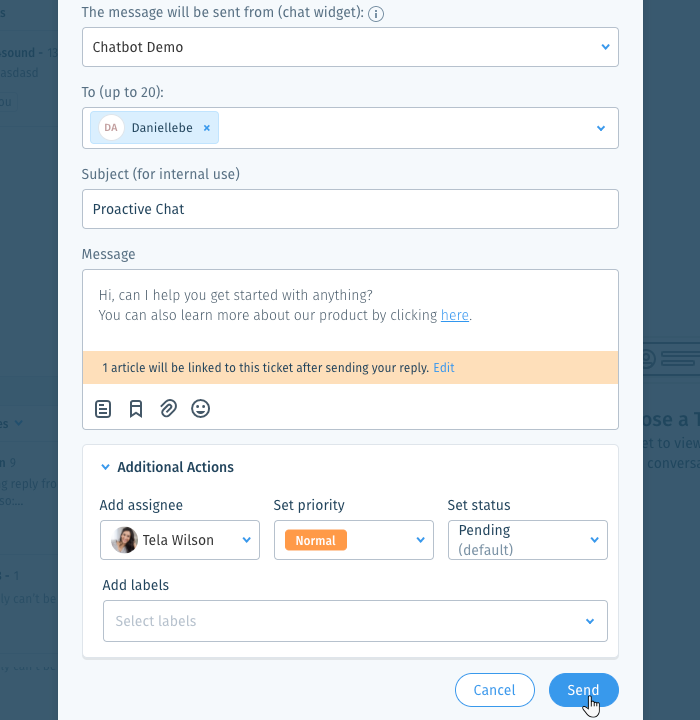
- Click the Select widget drop-down and select a Live Chat widget.
Note: If you don't see the widget you want to use, make sure you've added Live Chat to it. - Select up to 20 recipients from the Search for contacts drop-down.
- Enter the chat ticket subject in the Subject (for internal use) field.
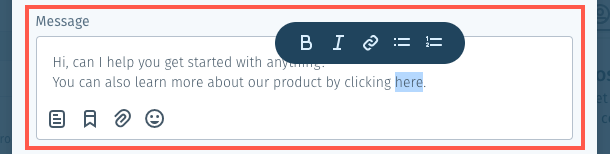
- Click the Message field and create the message you're sending using the following features:
- Rich Text: Enter text then select it to apply any of the following formatting options:
- Bold: Click the Bold icon
 to make your text bold (or press Ctrl + B).
 - Italics: Click the Italics icon
 to italicize your text (or press Ctrl + I).
 - Link: Click the Link icon
 to hyperlink your text. Paste the URL or the link or search for an article and select it, then click Insert Link.
 - Bulleted List: Click the Bulleted List icon
 to format as a bulleted list.
 - Numbered List: Click the Numbered List icon
 to format as a numbered list.
- Bold: Click the Bold icon
- Link an article: Click the Knowledge Base icon
 to add article links or content. Learn More
 - Add a saved reply: Click the Saved Reply icon
 to insert a saved reply. Learn More
 - Attach a File: Click the Attachment icon
 , then select a file from your computer and click Open. Learn More
 - Insert an emoji: Click the Emoji icon
 and select an emoji.
- Rich Text: Enter text then select it to apply any of the following formatting options:
- (Optional) Assign the ticket to a team member, set its priority, or add labels. Click Additional Actions and choose what you want to do:
- Assign the ticket: Click the Add assignee drop-down, enter the name of the team member that will be assigned to the ticket and select them from the list.
- Set the priority: Click the Set priority drop-down and select the ticket priority level (Low, Normal, or High).
- Set status: Click the Set status drop-down and select the chat ticket's status.
- Add labels: Click the Add labels drop-down, enter a label name and select it from the list. Learn how to create labels so they appear in the list.
- Click Send.
Note:
The default status of new outbound chat tickets is Pending. Learn more about ticket statuses.
Was this article helpful?